Showing posts with label sharepoint 2013. Show all posts

Friday, May 31, 2013

How to create web application & site collection in SharePoint 2013


Before creating a site collection, you must first create a Web application because site collections reside in a web application. Here is the full structure of SharePoint site collection:


You can see in structure that a site collection is the collection of one top-level site and sub sites. All content of a site collection stored in a single content database. You can clearly see the figure that the top level of organization is web application. Web applications also need at least one content database to store all data. Now let’s move the steps to create a web application in SharePoint 2013:

Create web application:

SharePoint 2013 Central Administration > Application Management page


To create a new web application, click on manage web application


After that click on new button


After that you will see that the page is about to load.


After the page is load, you will see “Create New Web Application”  dialog window:


When you scroll down the this dialog windows, you will see various settings like:


  • Allow Anonymous- NO
  • Use SSL- NO
  • Check Enable Windows Authentication Check Box
  • Check Default Sign in Page
  • Check Create new application pool
  • Enable Customer Experience Improvement Program: Yes


After applying above settings, click on Register new managed account & you will see following window:


After that click on OK, Next window will come like this:


After loading, this windows will come & confirm that you web application is about to create.


Click on Ok to successfully create a web application.

Here is the first look of your new created web application which is listed in SharePoint Central Administration Web Application under Central Administration > Application Management > Manage web applications


You can also delete a web application if needed; go to Central Administration’s Application Management page. Under the SharePoint Web Application Management section, click Delete Web application. This case comes when you are unable to access your site collection and web application. It happens when the web application get corrupted and unusable. In this case, you could be forced to delete the web application or you have use third party SharePoint Recovery Software to successfully repair your inaccessible web application. Check this presentation to know more about SharePoint Recovery Software:


If you have accidentally deleted your web app & you want to restore it then you have restore all content databases and site collections in the farm.

Create Content Database:

Before creating a site collection, first create a content database:

From Central administration screen and under "Application Management" click on Manage Content Database

After that click "Add a Content database"


If you create a new site collection then you need a particular Content Database to store it. Before creating site collection, you must check that the status of each content database is set to stop. You only need to start content database that is required.

click on all Database names and change Database status from ready to offline & click ok.


After creating & managing the content database, you can create site collection. Now let’s move the steps to create a site collection in SharePoint 2013:

Create Site Collection:

Click on Central Administration > Application Management > Create Site Collections


First select the web application in which you want to create a site collection.

Mention the title and description for your site.

After that select the template according to your need such as Collaboration, Meetings, Enterprise, Publishing & Custom.

Click ok.

You can see your created site collection by clicking "Application Management" from central admin. Click on "View All site collections" under Site collections section.

Here is list of Site Collections:


Here is the first look of your site collection:


If you want to delete the site collection, you can do it by following steps:


  • Start SharePoint 2013 Central Administration
  • On the start screen click on SharePoint 2013 Central Administration.
  • On the Central Administration website>>click Application Management.
  • In the Site Collections section, click on the Application Management page then click Delete a site collection.
  • On the Delete Site Collection page>>click Change Site Collection.
  • Now you will see Select Site Collection dialog box.
  • In the Web Application list>>click Change Web Application.
  • Now you will see Select Web Application dialog box.
  • After that Click the name of the web application which contains the site collection that you want to delete.  
  • Click the relative URL of the site collection that you want to delete, and then click OK.
  • Verify that the site collection information is correct or not.
  • On the Delete Site Collection page, click Delete.
  • After that site collection will get successfully deleted. 


If you want to restore deleted site collection, you can do it by using Restore-SPDeletedSite Windows PowerShell cmdlet. Because when a site collection is deleted, it stored in the SPDeletedSite object.


After creating the site collection, you can create sub sites. Now lets move the steps to create a sub sites in SharePoint 2013:

Create Sub Site:

This site will create under site collection. For this click on Settings button and then select Site Contents option & then click on Site Contents page.

After that Click on new subsite link.


Mention the site title, description, web site address & then select the Template for your subsite. Also set the permissions and navigations according to your need. After that Click on Create button to start creating a new subsite


Now you will see that your sub site has been created.


Congratulation, you have successfully created your web application, site collection and subsites.

Tuesday, April 30, 2013

How to upgrade SharePoint 2010 to SharePoint 2013


As clearly indicates in the figure, SharePoint 2013 up gradation divided in to five stages: 


First Stage: Create SharePoint 2013 Farm: 

As shown in the figure, first install SharePoint 2013 to a new farm and then set the SharePoint 2010 farm to read-only. 


Second Stage: Copy Databases to New Farm: 

Use SQL Server Management Studio to copy databases to a new farm. First set the databases to read-only mode and then back up the content and service application databases from the SQL Server instance to SharePoint 2010 Products farm. After that restore content and service application databases copy to the SQL Server instance on the SharePoint 2013 farm and then set the databases to read-write on the new SharePoint Server farm.


Third Stage: Upgrade SharePoint Service Applications: 

In this stage, first configures the SharePoint service applications for the new farm. As clearly shown in the figure, create a web application on the SharePoint 2013 farm with same urls & port numbers for each SharePoint 2010 web application. 


After that installs all server-side customization just like shown in figure.


Fourth Stage: Upgrade Content Databases: 

After completing the all above process, attach the content databases to the new farm and then upgrades the content databases for those web applications.  


Fifth Stage: Upgrade Site Collections:

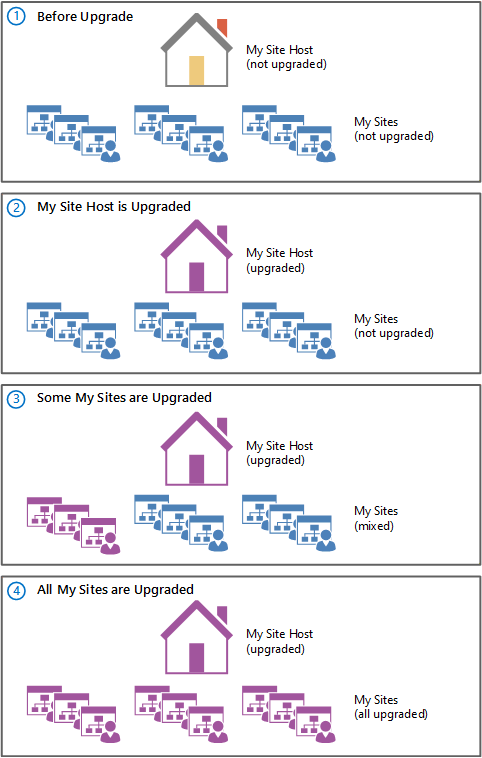
In the final stage, upgrade site collections. In this stage, first we have to upgrade My Sites & then to upgrade Products site collections. 

'My Sites' are upgraded by the site owners & covers four stages process which is clearly indicate in the figure:


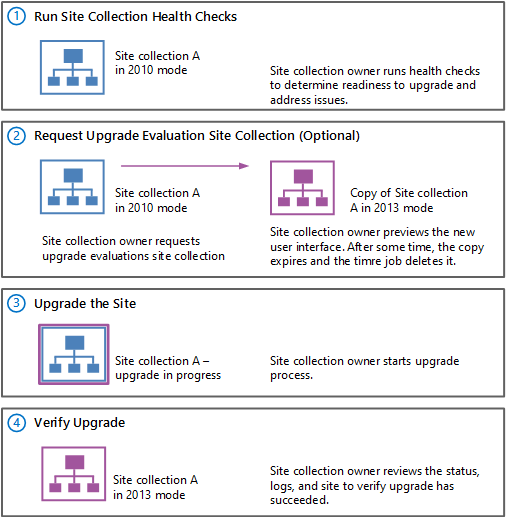
If you are a site owner & get the upgrade notification on your site's home page about new version availability then start upgrade your sites as soon as possible. Site collection up gradation divided in to four stages which are clearly shown in the figure:


Hope the article will help you to upgrade SharePoint 2010 to SharePoint 2013.

Tuesday, April 9, 2013

Mobile devices in SharePoint 2013


SharePoint Server 2013 offers many new advanced mobile device features for different mobile platforms. Some are including the mobile browser experience, device channels, Office web apps, location, Push notifications, Business intelligence content, subscribe to mobile alerts. Let’s elaborate these points one by one: 

1. Mobile browser experience

SharePoint Server 2013 offers three views according to your mobile browser to improve the mobile browser experience:
 
Classic view: This view present in HTML format & provides compatibility for mobile browsers that failed to present in the new contemporary view.  

Contemporary view: This view present in HTML5 & offers an optimized mobile browser experience to users. This view is available for Mobile Internet Explorer version 9.0 or later versions for Windows Phone 7.5, Safari version 4.0 or later versions for iPhone iOS 5.0 and the Android browser for Android 4.0 or later versions. Here are some advanced features of contemporary view: 

Menu button Check: Right side of the title area of the contemporary view. This includes the following features:
  • View Site Contents used to view all of the site content on the SharePoint site including lists and document libraries.
  • Sign Out used to log out from SharePoint.  
  • Close used to closes the Command button menu and get back to the SharePoint site.
Switch to PC View: This view used to display from mobile browser view to a full desktop view of a site. This view is present in both contemporary and classic views in SharePoint Server 2013.  

Navigation window: Check left side of the title area of the contemporary view. This navigation window presents a single menu with breadcrumbs, top navigation, and quick launch navigation from the full desktop view of the site. 

Tap-to-open links: As name indicates, it displays text or icons on a wide strip that is easier for a user to tap.

Pagination: Lists with more than 20 items are automatically paginated.

New and edit functionality: You can create a new list items and edit them in the contemporary view. 

Full-screen UI: You can see full desktop view of a SharePoint site on a Smartphone device.


2. Device Channels: 

In Oldest versions of SharePoint Server, there was a single default mobile view that was auto-generated based on the existing site. Device channels in SharePoint Server 2013 used to present a single site in multiple ways by using different designs on different mobile devices such as Smartphone, tablets etc. 


3. Office web apps:

In older version of SharePoint , Office Mobile Web Apps used to open documents in the mobile web application by using a mobile browser. When Office Web Apps Server is installed on Older version of SharePoint Server , Office Mobile Web Apps is also get installed on the server. 

In SharePoint Server 2013, Office Web Apps Server is a new stand-alone server product that provides mobile browser-based viewers for Word, Excel, PowerPoint etc named as Word Mobile Viewer, Excel Mobile Viewer, and PowerPoint Mobile Viewer. 

4. Location:

SharePoint Server 2013 offers geolocation field type that can be used in a list. 

5. Push notifications:

To receive notifications from a SharePoint site to mobile devices, device applications must be register with a SharePoint site. After register, you can write event handler code to interact with Microsoft Push Notification Service of other mobile device platforms. Notifications can be any type like events on the site etc. 

6. Business intelligence content:

This features of SharePoint Server 2013 used to view certain kinds of dashboard content.  

7. Subscribe to mobile alerts:

This feature enable users to subscribe the alerts that are sent by using Short Message Service. These alerts are sent to the mobile device when the changes are made to a SharePoint list or item.  

Tuesday, March 26, 2013

SharePoint 2013 Backup and Recovery cmdlets

Whatever is the theme of your business, your full business depends on your data & if you lost your data, it can interrupt your whole business continuity. So if you don't want to OUT OF the MARKET then you should plan for proactive backup and recovery policies for your data. There are so many reasons of data corruption and not all are easily fixed. Here is the survey of data loss reasons: 


But one of the famous & working approach to keep your data safe is 'BACKUP'. SharePoint 2013 is also introduced Backup and recovery cmdlets which will help you to backup & recover your corrupt SharePoint Server. You can use this SharePoint 2013 functionality to backup & restore various SharePoint items such as Farm, Site collection, Configuration database, Services, document etc. 


Let’s have a look of all cmdlets one by one: 


Backup-SPConfigurationDatabase: 


This cmdlet used to perform either configuration-only backup of the current farm or a configuration-only backup of a separate configuration database which is not attached to the current farm. If you wish to perform a configuration-only backup of the current farm. Here is command: 


Backup-SPConfigurationDatabase -Directory <String> [-AssignmentCollection <SPAssignmentCollection>] [-DatabaseCredentials <PSCredential>] [-DatabaseName <String>] [-DatabaseServer <String>] [-Item <String>]


AND


Backup-SPConfigurationDatabase -ShowTree <SwitchParameter> [-AssignmentCollection <SPAssignmentCollection>] [-DatabaseCredentials <PSCredential>] [-DatabaseName <String>] [-DatabaseServer <String>] [-Item <String>]


Backup-SPFarm: 


This cmdlet used to create entire farm backup or individual components within the farm. Here is command: 


Backup-SPFarm -BackupMethod <String> -Directory <String> [-AssignmentCollection <SPAssignmentCollection>] [-BackupThreads <Int32>] [-ConfigurationOnly <SwitchParameter>] [-Confirm [<SwitchParameter>]] [-Force <SwitchParameter>] [-Item <String>] [-Percentage <Int32>] [-WhatIf [<SwitchParameter>]]


AND


Backup-SPFarm -ShowTree <SwitchParameter> [-AssignmentCollection <SPAssignmentCollection>] [-ConfigurationOnly <SwitchParameter>] [-Confirm [<SwitchParameter>]] [-Item <String>] [-WhatIf [<SwitchParameter>]]


Restore-SPFarm: 


This cmdlet used to restore one or more items (individual database, Web application, or the entire farm) from the backup. Here is command: 


Restore-SPFarm -Directory <String> -RestoreMethod <String> [-AssignmentCollection <SPAssignmentCollection>] [-BackupId <Guid>] [-ConfigurationOnly <SwitchParameter>] [-Confirm [<SwitchParameter>]] [-FarmCredentials <PSCredential>] [-Force <SwitchParameter>] [-Item <String>] [-NewDatabaseServer <String>] [-Percentage <Int32>] [-RestoreThreads <Int32>] [-WhatIf [<SwitchParameter>]]


AND 


Restore-SPFarm -Directory <String> -ShowTree <SwitchParameter> [-AssignmentCollection <SPAssignmentCollection>] [-BackupId <Guid>] [-ConfigurationOnly <SwitchParameter>] [-Confirm [<SwitchParameter>]] [-Item <String>] [-WhatIf [<SwitchParameter>]]


Backup-SPSite: 


This cmdlet used to perform site collection backup when the 'Identity' parameter is used. Here is command: 


Backup-SPSite [-Identity] <SPSitePipeBind> -Path <String> [-AssignmentCollection <SPAssignmentCollection>] [-Confirm [<SwitchParameter>]] [-Force <SwitchParameter>] [-NoSiteLock <SwitchParameter>] [-UseSqlSnapshot <SwitchParameter>] [-WhatIf [<SwitchParameter>]]


Restore-SPSite: 


This cmdlet used to restore a site collection to a location specified by the 'Identity' parameter. Here is command: 


Restore-SPSite [-Identity] <String> -Path <String> [-AssignmentCollection <SPAssignmentCollection>] [-Confirm [<SwitchParameter>]] [-ContentDatabase <SPContentDatabasePipeBind>] [-Force <SwitchParameter>] [-GradualDelete <SwitchParameter>] [-HostHeaderWebApplication <String>] [-PreserveSiteID <SwitchParameter>] [-WhatIf [<SwitchParameter>]]


Get-SPBackupHistory: 


This cmdlet used to track the history of backup and restore operations that have been completed. Here is command: 


Get-SPBackupHistory -Directory <String> [-AssignmentCollection <SPAssignmentCollection>] [-ShowBackup <SwitchParameter>] [-ShowRestore <SwitchParameter>]


If your Backup is Not Good Enough to perform Restoration then WHAT?


If your backup is not well structured then it will not help you to recover your data at any cost. In this case, you have one another solution to repair your corrupt SharePoint database that is SharePoint Server Recovery Tool. These software help users to repair corrupt SharePoint database in all corruption cases. 


A good backup is an excellent approach to prevent data loss & repair database in most of the data corruption cases. 

Wednesday, February 20, 2013

Advanced features of SharePoint 2013


Microsoft includes many new features and capabilities in new SharePoint 2013 version. SharePoint 2013 gets completed with combination of these five words: Share, Organize, Discover, Build & Manage. This version allows you to share your work with others, organize your projects and teams, and discover people and information.  

Here is the list: 


Video Support: In the previous version of SharePoint, you cannot upload videos into libraries. But in SharePoint 2013, you can easily upload a video. 

Community Sites and Portals –


Now you can also design a community site in SharePoint 2013.  If you wanted a community site for your organization, then you can use Team Site template and modify it to accomplish having a community site. These sites are registered within a Community Portal. This is one of my favorite features as now I have a central place for my organization from where people can locate communities. 

Device Channels – In the previous version of SharePoint, there was a single default view set up for mobile users. The only problem with this view is that it may or may not be user friendly to a mobile device. In SharePoint 2013, we have a feature to publish a single site in multiple ways using different designs that target different devices.

SharePoint Apps: Users can add SharePoint Apps to pages or use them from within SharePoint.


Cloud First: Now SharePoint 2013 supports cloud also. 


Simple project / task management: In SharePoint 2013, the new team site template used to manage tasks & projects. You can also assign deadlines and simple work breakdown structure for your project team.  

More Advance SharePoint Analytics: Now in SharePoint 2013, SharePoint analytics divided in to 2 new tools: search analytics and usage analytics.  

Hope the article will help you to learn advanced features of SharePoint 2013. 

Thursday, November 29, 2012

How to restore SharePoint 2013 Content Database


In my previous post I have shared about SharePoint 2013 content database backup. To restore SharePoint Content Database we can select any option out of three in SharePoint 2013: SharePoint Central Administration, Windows PowerShell, SQL Server tools. Here are steps to restore SharePoint 2013 Content Database:

Windows PowerShell:

Before using Windows Powershell, ensure that you have securityadmin, db_owner, Administrators group memberships. 

1. Start the SharePoint 2013 Management Shell by using following path:

Start>>All Programs>>Microsoft SharePoint 2013 Products>> SharePoint 2013 Management Shell.

2. Type following command on Windows PowerShell command prompt:

Restore-SPFarm -Directory <BackupFolder> -RestoreMethod Overwrite -Item <ContentDatabaseName> [-BackupId <GUID>] [-Verbose]

Here <BackupFolder> is the name and path for the backup folder & <ContentDatabaseName>is the name of the content database.

SharePoint Central Administration: 

Before using this method, first make sure that the user who is performing the procedure should have member of Farm Administrators SharePoint group.

1. Start SharePoint 2013 Central Administration.

Start>>Microsoft SharePoint 2013 Products>>SharePoint 2013 Central Administration

2. In Backup and Restore section>>Restore from backup>>select backup that you want to restore (select same backup job that content database backup have)>>click 'Next'.

3. In 'Restore Option' Section>> click same configuration option.

4. Click Start Restore.

SQL Server tools: 

Before using SQL Server tools, first you should verify that the user that is going to perform the procedure should be member of sysadmin. 

1. Open SQL Server Management Studio
2. After that connect to the database server.
3. Object Explorer>>expand Databases.
4. Right-click the database that you want to restore>>Tasks>>Restore>>database.
5. Restore Database>>specify the destination>>select the backup that you want to restore.
6. Select a page pane, click Options.
7. Restore options>>Overwrite the existing database.
8. Recovery state

  •  Use RECOVER WITH RECOVERY option if you want to restore all the transaction logs.
  •  Use RECOVER WITH NORECOVERY option if you want to restore additional transaction logs.


9. Click OK to complete your recovery process. 

Hope the steps will help you to successfully restore SharePoint Content database.